Blender 3D + Carnegie Mellon .bvh motion capture remapping
Today I’m investigating how to use bvh motion capture files with my blender models (~Blender 2.49). The bvh files are provided by Carnegie Melon University with the Blender compatible conversions here, there’s over 2000 files and they’re an awesome resource if you’re looking for naturalistic human motion, less so if you’re looking for the ‘stretch-and-bounce’ type animation you’d find in cartoons. They won’t fit every situation and they will need cleaning up before they are really useful but for quickly having access to a large number of actions - for free - they can’t be beat.
When considering whether to go the bvh route also bear in mind that humans, being intrinsically asymmetric organisms, are unlikely to produce perfectly matched strides, for example, so if you’re after looping animations be aware that there will likely be a fair amount of work needed to get loops to line up.
A note about the files - the authors point out that in some of the earlier captures things can be a bit wonky as they were ironing out kinks in the system so for preference start searching from the end of the listing and work backwards towards the beginning for best results.
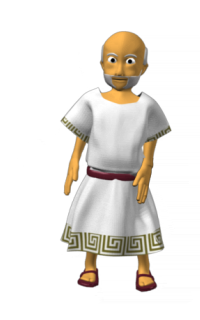
To start you’ll need a blender model - since all the motion capture files provided by CMU are humans the model should be bipedal unless you specifically want a lama walking on it’s hind legs and moving it’s front legs like human arms. Here is my model, it’s the ancient Greek philosopher Socrates in case you didn’t recognise him - I created him for an educational project I was working on recently for Edcoms in London.

Normally, once the modelling is finished you’d want to start constructing an armature to rig the character with. While in theory it wold be possible to use your own armature you’d have to make sure the bone hierarchy exactly matched that of the bvh files we are going to import later. Easier, then, to use the armatures that are created by Blender’s import .bvh script and tweak that to fit the model.
With the model in place it’s time to grab some bvh files, the full repository of Blender compatible files I used are here, and the reference list of al 2548 motions is here. I’ve already used a walk and a run action so I’m going to choose something a bit more exciting for this demo.. how about 143_34 Chicken Dance - just the sort of thing a good philosopher needs to be able to do!
I’ll animate him naked for starters then maybe have a go at some cloth simulation on his toga when I’m happy with the movement.
1.Get BVhacker (win only) but I have Virtual Box set up on mac.
2.In BVHacker import the bvh file (there is a list of which action is in which file here or in every download package.
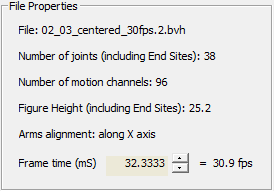
3.Notice that the model is not centred (try importing directly into Blender first as a previous step to illustrate). Also the frame rate is much too high.
4.IN BVHacker reduce the framerate by twirling the up button(!) like so:

until it’s at around 30fps or whatever you need for your project
6.Now we need to center the motion, again in bvhacker click ‘center’ 7.make sure the animation is at frame 1 and in the same group of buttons click set T

8.Save the file and open your model in Blender.
9.Hit File -> Import -> Motion Capture (.bvh) and select the saved bvh file.
10.In the dialog that pops up select Armature and scale to 1.0 (this worked pretty good for me but it will depend on the size of your model - you may need to try a few times to get a reasonable scale, write it down and remember it so you can use it for any other armatures you import)
11.Blender operates with a z-Up so the first thing to do, in Object mode, is rotate the imported armature/actions -90
Toggle between edit and pose mode with the armature selected, there should be no movement - if there is we’ll need to do some work to correct
In IPO mode we want to select the hip bone (very small so use outliner to select) as move it’s z position down across the whoile range of frames.. this will retain any movement relative to it’s base position.
12.Now it’s time to fit the armature to your model. Note this will only need to be done once for each model so it’s worth taking your time and doing it well now. Switch between edit mode for both the model and the armature and pull vertices around where necessary, and resize bones where necessary. This will be easier if you cut your symetrical mesh in 1/2 and apply a mirror mdifier - we will apply the modifier after everything is lined up.
13.Once the armature fits nicely inside the mesh apply the mirror modifier and then it’s time to assign vertex weights so that movements of the armature will pull the correct vertices around. In order to do this you can either paint vertices directly in weight-paint mde (really difficult to do well) or have blender do it automatically for you (really easy).
14.Lets choose “really easy” as a way forward.. In Object mode a(-a) to deselect everything, select the model, shift select the armature then CTRL-P Make Parent To -> Armature, Create Vertex Groups? -> Create From Bone Heat. (If you need to unparent use ALT-P)
15.In theory that’s it, however theory is one thing and the real world is something else. If bits of your model get left behind when your character starts moving or if the mesh deforms in strange ways the create from bone heat process has likely not mapped all vertices correctly. Not to worry, we can simply go into weight paint mode (CTRL-Tab) and manually paint any unmapped vertices. I find it beneficial to make use of Blender’s ‘Set Clipping Border’ function Alt-B to isolate portions of the mesh with hard-to-access vertices (such as the interior of the mouth - so I can attack them from the inside (img)
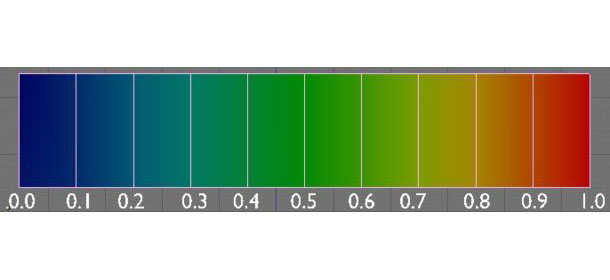
Sometimes you might find that a particular bone is having too much effect on certain vertices in which case you can select the bone to see what influence it’s having and repaint to modify. Here is the color spectrum/weight mapping blender uses.

16.When you’re happy with the movement of all vertices in the mesh you’re done. Now it’s a simple job to have your character perform any of the 2000+ mocapped actions from the CMU files. Simply prepare the BVH file as above in steps 5..10 then import into blender. Delete the new armature - we don’t need that. Open the Action editor and with the character’s armature selected change the action in the dropdown.
Other things you might need to do:
-parenting eyes, hair, glasses etc
-editing ipo’s:
I needed to maintain vertical movement in the armature which would be lost if I centered the Y attribute in BVHacker so instead I did this in the IPO editor, bone heat went screwy otherwise since the armature was not inside the mesh in object mode. Select hip bone (master) open the IPO editor, .. the important thing is that the model and the armature match up in all states of edit, pose and object modes.